Wednesday, December 31, 2008

Puzzle Card

I went to Michael's last Friday to do some post-holiday shopping. I don't go there often because I buy all my paper crafting supplies from Stampin' Up! But they had Sizzix dies for 50% off and I couldn't resist buying the Puzzle Maker #2 die. How fun to make a card that you have to put together!

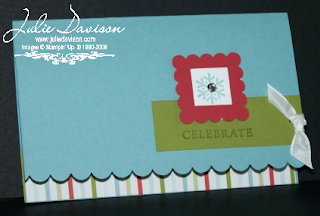
Kristina's Color Inspiration Challenge was the perfect opportunity to make my first puzzle card. And this week's colors (Rose Red, Pretty in Pink, and Olive Olive) lended themselves well to my new Petal Pizazz stamp set. This new flower set will be available in the Spring-Summer Catalog -- which starts in three short weeks on Monday, January 19!

Here's the front of the card:

I also used the Big Shot to cut the mini scallop envelope, which holds the puzzle pieces. The envelope flap tucks under the flower circle, which is adhered to the envelope with a brad. So the flower stays put and the envelope flap tucks under that to stay closed. (Side note: Sticky Strip is a MUST for adhering the envelope together! I also used it to adhere the envelope to the card.)

For the puzzle itself, I used a piece of the white cardboard that comes with the DSP so that my puzzle would be extra sturdy.

Supplies: Petal Pizazz, Thank You Kindly, Basic Black ink pad, Rose Red ink & cardstock, Pretty in Pink ink & cardstock, Old Olive ink, Whisper White cardstock, Flower Fusion felt flowers, Earth Elements brads, 1/4" Pretty in Pink grosgrain ribbon, Blueberry Maine DSP, Puzzle Maker #2 and Scallop Envelope dies for the Big Shot

P.S. Thank You Kindly is on sale for 20% off with a $20 purchase as part of the Catalog Sampler promotion until January 18. Click here for details.

Tuesday, December 30, 2008

Vertical Photo Garland

Today is the very last day to order the Country Living Holiday Collection Stampin' Kit. Click here for all the details. So here is one last project to further entice you. I turned the pieces for the photo garland into a vertical wall hanging!

Here's a close-up of the top:

I used a stapler to staple the chipboard squares to the ribbon.

Then I covered both sides of the chipboard squares using the die-cut Designer Series Paper that comes in the kit. I used the Tombow Multi Adhesive (also in the kit). I covered the scallop frame chipboard with White Craft ink (from the kit) and let it dry. Then I used the Tombow Multi Adhesive again to cover it with glue and Dazzling Diamonds glitter (also in the kit). The only things I added for this project were the Baja Breeze stitched ribbon and a "bracket" chipboard piece from another chipboard collection.

**Special Offer** Be one of the first three to order a Country Living Holiday Collection Stampin' Kit from me today and I will send you a free piece of ribbon and chipboard bracket so that you can make this project at home!

Supplies: Country Living Holiday Collection Stampin' Kit, Baja Breeze stitched ribbon, chipboard bracket, stapler

Monday, December 29, 2008

Emerging Color on DSP

I created this 12x12 scrapbook page spread earlier this month to demonstrate at a workshop. Unfortunately, we had to postpone the workshop when the hostess got sick. (Was there anyone who didn't get sick in December? We had a least one round of yucky stuff at our house!)

ANYWAY...the stamp set I used for this spread is the Holiday Collection stamp set that is exclusively available in the Country Living Holiday Collection Stampin' Kit. There are only two days left to order this kit, so get off the fence and order it before it's too late! (wink!) [You know the routine: Go to my website at http://juliedavison.stampinup.net/ and click "Shop Now" to get your stampin' hands on this great kit.] Click here for more info on the kit and click here for more project ideas.

I used the Serif Essential alphabet dies with the Big Shot to create "HOME" and then printed "for the holidays" directly onto the Baja Breeze cardstock using the Woodward Script font from the Write Me a Memory Font CD.

I used the Emerging Color technique on these pages. Click here to view my earlier post about this technique. Instead of stamping the paper first, I started with some of the Ski Slope DSP. [Genius idea inspired by Sara and Barb!] I clear embossed snowflakes on the paper and then brayered over with Not Quite Navy Classic ink. I love the way it turned out. Here's a close-up that shows the patterned paper showing through:

Supplies: Country Living Holiday Collection Stampin' Kit, Ski Slope DSP, Whisper White Craft ink & cardstock, Baja Breeze ink & cardstock, Not Quite Navy ink & cardstock, Versamark ink pad, Clear Embossing powder, Heat Tool, Brayer, Serif Essentials alphabet dies for the Big Shot

Saturday, December 27, 2008

Love You a Latte Card

Here's a card from an old card class. We used the Stampin' Pastels with a Q-tip to color in the mug. The Pun Fun stamp set is very versatile and includes stamp images that work for lots of different occasions.

Pun Fun: #111028, $30.95

Supplies: Pun Fun, Seeing Spots Jumbo wheel, So Saffron cardstock, Basic Grey ink & cardstock, Pumpkin Pie ink & cardstock, Whisper White cardstock, Pumpkin Pie striped ribbon, Crafter's Tool Kit, Stampin' Pastels

Friday, December 26, 2008

Ssssssaying Hi

Stacey's Jewelry Color Inspiration Challenge had me seeing green this week! She chose three shades of green: Always Artichoke, Old Olive, and Green Galore. I managed to work them all in on this snake card. I love the textured Artichoke cardstock to set off the snake. I borrowed Mom's Naturally Serif alphabet die for the Big Shot to cut the letters and spell "Hi".

I used the Old Olive and Green Galore markers to color this snake from the Zoofari stamp set.

[The finished card is 3" x 6".]

Supplies: Zoofari, Naturally Serif alphabet die for the Big Shot, Always Artichoke cardstock, Old Olive marker & cardstock, Green Galore marker & cardstock, Basic Black ink pad, Whisper White cardstock, Very Vanilla cardstock, Twill Tape

Thursday, December 25, 2008

Merry Christmas!

The sentiment from this Snow Swirled stamp set, stamped on the inside of this card is perfect: "May the true spirit of Christmas fill your heart with peace, your home with love."

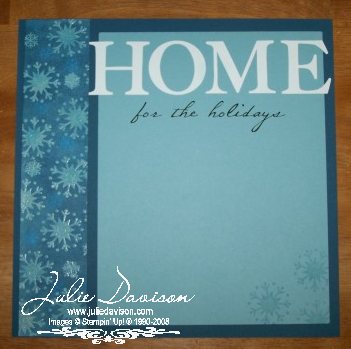
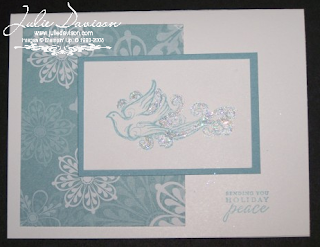
I hope you are surrounded by loved ones and enjoying this Christmas day!

Supplies: Snow Swirled, Ski Slope DSP, Old Olive ink, Real Red cardstock, Whisper White cardstock, Versamark pad, Gold Embossing Powder, Heat Tool, Gold Brads, Crafters' Tool Kit, Bold Bright Brads

Wednesday, December 24, 2008

From My House to Yours...

Season's Greetings! I am spending the week with my family in Michigan. I love the chaotic crazy love that comes with having our extended family of 15 staying under the same roof! I'm looking forward to celebrating Christmas with our usual traditions and enjoying the magic of this holiday through the eyes of our young children. I hope that you are spending time with family and friends this week and that you feel as blessed and loved as I do this Christmas!

I used the blender pens to watercolor the sky, door, and windows on this card. And I added 2-way glue and Dazzling Diamonds to the roof and snow. (I'd hard to see the glitter in the photo, but it really sparkles.) I'm happy with this card, but after seeing the photo, I think that it needs a piece of 1/4" Chocolate Chip ribbon tied around the striped paper...

Supplies: To You and Yours, Chocolate Chip ink pad & cardstock, Baja Breeze ink & cardstock, Real Red & So Saffron markers, Whisper White cardstock, Ski Slope DSP, Blender Pens, 2-way glue & Dazzling Diamonds

Monday, December 22, 2008

Holiday Collection Ornaments & Tags

I used the Country Living Holiday Collection Kit to make some chipboard ornaments and tags for the tree.

It was so easy! The kit comes with die-cut paper to match the chipboard pieces. I used the Tombow Multi Adhesive to adhere the paper to each side of the chipboard. I punched a hole with the 1/16" hole punch and attached a piece of silver cord (also in the kit). These special edition kits are available while supplies last until December 31. Click here for more information about this versatile kit.

Sunday, December 21, 2008

Holiday Trinkets Card

Here is the fourth and final card from my Christmas Card stamp-a-stack class two weeks ago. We used the markers to color directly on the holly stamp from Holiday Trinkets.

To make the notch in the Old Olive strip (which is 1" x 4"), use the 3/4" Square Punch and line up the edge of the cardstock diagonally across the center of the punch like this:

Supplies: Holiday Trinkets, Sincere Salutations, Real Red marker & cardstock, Old Olive ink/marker & cardstock, Whisper White cardstock, Kraft cardstock, 3/4" Square Punch

Saturday, December 20, 2008

Jingle Shells Card & One Hole Bow "How To"

This was one of our stamp club projects this month. This stamp set, Crab & Company, is retiring and will no longer be available after January 18. So make sure to get it (and the matching Sandy Shells wheel) while you can!

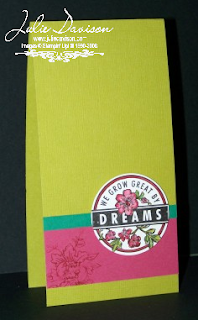
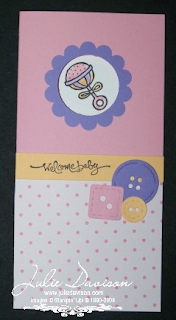
The Creamy Caramel flap (2-3/4" x 8-1/2", folded in half) opens to reveal the greeting/message underneath. I tied the bow using the "One Hole Bow" technique. I didn't come up with this myself, but it's a very handy trick for helping to tie your ribbon straight and tight on your card.

Start by punching a 1/8" hole in your cardstock where you want the knot/center of the bow to be. Then, take the ribbon across the front of the cardstock and bring both ends around the back and up through the hole. Here's a side view:

Pull it tight and move the ribbon so the ends are on either side of the ribbon in the front. Then tie and knot (or bow).

Easy Peasy Lemony Squeezy! Happy Bow-Tying!

Supplies: Crab & Company, Sandy Wheels wheel, Basic Black ink & cardstock, Whisper White cardstock, Real Red marker & cardstock, Creamy Caramel marker & cardstock, 2-way glue pen, Dazzling Diamonds glitter, 1/4" Real Red grosgrain ribbon, 1/8" Hole Punch

Friday, December 19, 2008

Bon Appetit Chalk Board

Last Friday, my upline had a Christmas party for her direct recruits. We did a gift exchange and I received this gift from Sherla.

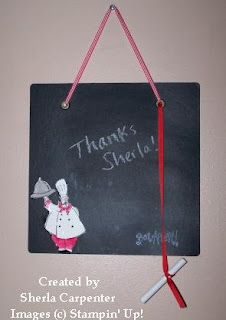
She covered a large On Board Book Basics cover (item #110713, $7.95 for 4) with chalkboard paint and embellished it with the chef from the Voila stamp set (item #106632, $23.95). Isn't it great?! I love the jumbo eyelets and ribbon, making it perfect to hang in the kitchen and answer that question that's on everyone's mind: "What's for dinner?"

Thanks you, Sherla! I love it! And I can't wait to make another one for the kids. Thomas is already trying to swipe this one!

Thursday, December 18, 2008

Envelope Gift Card Holder

This gift card holder is super quick -- so quick that I made up 3 more while the kids ate lunch so I could "wrap up" Panera gift cards for Thomas' teachers & bus driver.

The best part is, you probably already have everything you need to make this yourself! The base of the gift card holder is a Medium Envelope! Start by opening the flap and folding the envelope in half. Cut along the fold on the flap. Lick and stick the left side of the flap down. Tuck the right side of the flap in (this is where you'll put the gift card). Decorate the front and inside however you'd like. I used the Bold Snowflakes wheel on a piece of Pacific Point cardstock and then adhered it to the inside to cover the left flap. For the front, I used a stamp from the Level 2 Hostess set called Deer Friends.

Supplies: Deer Friends, Many Merry Messages, Bold Snowflake Jumbo Wheel, Pacific Point ink & cardstock, Baja Breeze cardstock, Kraft cardstock, Muirfield DSP, Whisper White cardstock, Whisper White Medium Envelopes, 1-1/4" & 1-3/8" Circle Punches, Scallop Circle Punch, Baja Breeze ribbon, Stampin' Dimensionals

Wednesday, December 17, 2008

Season of Friendship Swap Card

I made this card for our demonstrator Holiday Mini card swap. I wanted to use the Season of Friendship card, but without the tree to show the versatility of the stamp set. Here's my card:


I used the "One Hole Bow" technique to tie the ribbon. Watch for a photo "how to" in the next couple days!

[The finished card measures 3" x 6".]

Supplies: Season of Friendship, Itty Bitty Backgrounds, Bashful Blue ink & cardstock, Brilliant Blue ink & cardstock, Whisper White cardstock, 1/4" White Grosgrain Ribbon, Bold Brights Brads

Tuesday, December 16, 2008

Snowy Day

It's snowing today here in East Central Illinois, so I thought a penguin and some snowflakes would be an appropriate theme for today's card using colors from KWerner's latest Color Inspiration Challenge. I love finding "non-traditional" colors to use on holiday cards and this combination was perfect: Close to Cocoa, Chocolate Chip, Baja Breeze, So Saffron, and Very Vanilla.


Here's a close-up of that cutie patootie penguin! If you're wondering, the penguin is from the Wild About You stamp set. I think he often gets overlooked in there with the other jungle animals.

Supplies: Wild About You, Many Merry Messages, Close to Cocoa cardstock, Chocolate Chip marker & cardstock, Baja Breeze ink & cardstock, So Saffron ink & cardstock, Very Vanilla cardstock, 1-1/4" & 1-3/8" Circle Punches, Scallop Circle Punch, Bold Snowflake Jumbo Wheel, 1/4" Chocolate grosgrain ribbon, Stampin' Dimensionals

Monday, December 15, 2008

Wild About Challenges

I do love a challenge! Stacey posted a new Jewelry Color Inspiration Challenge yesterday and I just couldn't help myself! It was a challenge to use Bravo Burgundy with Lovely Lilac, but I'm quite pleased with the way it turned out.

I stamped the giraffe from Wild About You in Pumpkin Pie, then used my 1/16" and 1/8" hole punches to punch holes where there were white spots. The holes allow the Bravo Burgundy cardstock underneath to show through.

Supplies: Wild About You, Pumpkin Pie ink & cardstock, Bravo Burgundy ink & cardstock, Lovely Lilac marker & cardstock, Old Olive marker, Whisper White cardstock, 1/16" and 1/8" Hole Punches, Bold Brights buttons, Stampin' Dimensionals, Mini Glue Dots

Sunday, December 14, 2008

Jewel-toned Dreams Card

The jewel tones in Stacey's Jewelry Color Inspiration Challenge this week are so pretty. But I would be lying if I said I didn't struggle with them. Well, just one in particular: Glorious Green. It's my least favorite Stampin' Up color. Thank you, Stacey, of making me stretch this week and forcing to use Glorious Green. It's really not a bad color!

I used my blender pens and the ink pad lids to watercolor the flowers. I used all four of the inspiration colors, layering the darker red and green over the lighter ones. For the flower in the left corner on the Rose Red cardstock, I used my marker and colored just the flower of the "Love You" stamp that comes in the Dreams du Jour stamp set. (Don't forget you can get this set 20% until January 18 with any $20 purchase!)
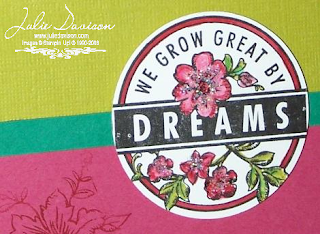

[The finished card measures 3" x 6".]

Supplies: Dreams du Jour, Basic Black ink, Whisper White cardstock, Kiwi Kiss ink& textured cardstock, Glorious Green ink & cardstock, Riding Hood Red ink & cardstock, Rose Red ink/marker & cardstock, 1-3/4" Circle Punch, 2-way glue pen, Dazzling Diamonds, Stampin' Dimensionals

Friday, December 12, 2008

Framed Snowflake Card

This layout may look familiar; It's the same as the Framed Silhouette card I made back in September. Check out the original post here to see how I made the scallop square frame.


For this winter version, I used the Country Living Holiday Collection Kit (the paper, stamp, ribbon, & rhinestone brad). The kit makes dozens of beautiful tags and ornaments, but it also comes with extra paper and cardstock that you can use to make cards. Click here for more information about this great kit.

Supplies: Holiday Collection stamp set, Fundamental Phrases stamp set, Baja Breeze ink & cardstock, Riding Hood Red cardstock, Old Olive ink & cardstock, Whisper White cardstock, 3/4" Square Punch, Scallop Square Punch, Scallop Edge Punch, 1/16" Hole Punch, 1/8" Hole Punch, Rhinestone Brads, White Taffeta Ribbon

Thursday, December 11, 2008

Season's Greetings Card

Here is the third card from my Christmas Card class last Friday. We used the Snow Swirled stamp set and heat embossed the star at the top and the greeting in gold on the Bravo Burgundy wide oval.

Supplies: Snow Swirled stamp set, Always Artichoke ink & cardstock, Bravo Burgundy cardstock, Whisper White cardstock, Versamark ink pad, Gold Embossing Powder, Wide Oval Punch, Crafters' Tool Kit (paper piercing tools), Gold Brads, Stampin' Dimensionals

Wednesday, December 10, 2008

Ginormous Flowers Cards

I broke out several soon-to-be-retired stamp sets for KWerner's latest Color Inspiration Challenge. What pretty colors she chose this week: Pale Plum, Perfect Plum, Certainly Celery, Sage Shadow, and Bordering Blue. I never would have put these colors together myself, but I love the way they look.

For my first card, I use the Dots are Hot set to make background paper. I love the way the paper turned out, but I wasn't happy with the final card. This square card measures 5-1/4" x 5-1/4".

So, I took another shot at the colors with my original idea and did an Emerging Color card.

"Emerging Color" is a technique based on an emboss resist. I stamped a white sheet of paper with lots of little flowers in different colors. I used flowers from Ginormous flowers and the tiny flower from Flight of the Butterfly. Make sure to keep the pattern really tight and close together. The next step is to clear emboss a larger, bold image over the paper. (I chose a larger flower from Ginormous flowers.) Finally, use a Brayer to cover the cardstock with a darker ink (I used Perfect Plum). Use a cotton ball or tissue to burnish over the embossed images and clear away excess ink. The colors from the flowers stamped underneath with show through.

Supplies (both cards): Ginormous Flowers, Flight of the Butterfly, Dots are Hot, Wonderful Words, Bordering Blue ink/marker & cardstock, Certainly Celery ink/marker, Sage Shadow ink/marker, Pale Plue ink/marker & cardstock, Perfect Plum ink/marker & cardstock, Whisper White cardstock, Coluzzle, Versamark ink pad, Clear Embossing Powder, Winter White Embossing Powder, 2-way Glue, Dazzling Diamonds, 5/8" Certainly Celery grosgrain ribbon, Stampin' Dimensionals

Monday, December 8, 2008

"Sleigh Bells Ring..."

"Are you listening? In the lane, snow is glistening..." Well, actually, the snow on the ground is melting, but this card sure is glistening! The photo doesn't do it justice. I stamped the image from the Sleigh Bells Ring stamp set with Bravo Burgundy Craft ink and heat embossed with the Iridescent Ice embossing powder. So pretty...

Supplies: Sleigh Bells Ring, Bravo Burgundy Craft/Classic ink & cardstock, Very Vanilla cardstock, Sahara Sand cardstock, Vanilla Taffeta Ribbon

Sunday, December 7, 2008

Peaceful Dove Card

Here is another card from my Christmas Card class on Friday. I had a great time stamping; thank you to everyone who came -- and special thanks to Terri for hosting us! I think this one was the favorite of those who attended. It was by far the "easiest" card, but it's simple elegance speaks for itself.

We applied the 2-Way glue to the swirls around the dove (not the bird itself) and then sprinkled on Dazzling Diamonds glitter. This is an easy way to add a little sparkle to your projects.

Supplies: To You & Yours stamp set, Ski Slope DSP, Baja Breeze ink & cardstock, Whisper White cardstock, 2-Way Glue Pen, Dazzling Diamonds glitter

Friday, December 5, 2008

Mr. Twigster Card

I finally broke down and bought Mr. Twigster. He's just too darn cute! Especially with the Frosty DSP from the Holiday Mini Catalog.

I'm headed to Springfield this evening and this is one of the four Christmas cards will be making in class tonight.

Supplies: Mr. Twigster, To You & Yours (greeting), Frosty DSP, Bashful Blue marker & cardstock, Tangerine Tango ink, Kiwi Kiss ink & cardstock, Basic Brown ink, Whisper White cardstock, Blender Pen, Photo Corner Punch, Gold Brads, White grosgrain ribbon

Thursday, December 4, 2008

Welcome Baby Card

I kind of threw this card together this evening before I went to the Post Office to mail a baby gift. I really felt like I was flying through it, pulling things out and slapping it together without second guessing myself. I like the way it turned out. Maybe I should rush more often! (wink!)

The rattle is glued to the inside of the card, but peeks through the window in the front of the card. To line it up, I closed the card and put the punch out through the window. Then I pressed down to adhere it through the window. I like how you can see the image on the inside too.

[The finished card measures 3" x 6".]

Supplies: Sock Monkey Accessories (rattle), Short & Sweet (welcome baby), Full of Life (inside greeting), Pretty in Pink Marker & cardstock, Apricot Appeal marker & cardstock, Lavendar Lace marker & cardstock, Basic Black ink, Whisper White cardstock, Button die for Big Shot, 1-1/4" Circle Punch, Scallop Circle Punch, Georgia Peach DSP